Norwegian producer and DJ Simon Field returns with Danger, a house record that cuts through precisely because it refuses to play things straight.
Built around a sleazy spoken male vocal, warped late-night energy and a sharp sense of timing, the track leans into personality over polish-for-polish’s-sake, while still carrying the kind of detailed, heavyweight production that has become synonymous with Field’s output.
With the track doing damager all over the place, we asked Simon to put together a deep-dive into its production.
“Danger” started from a late-night club idea built around tension and unpredictability. I wanted the track to feel slightly sleazy, hypnotic and energetic at the same time — something that could work in underground clubs but still have a very memorable personality.
The main idea was the tempo-shift in the middle of the track. That became the identity of the whole record and changed how I approached the arrangement not only sound design, but the whole recording process. From there, everything was about contrast: tight drums vs loose vocals, dark grooves vs unexpected moments, and clean low-end vs distorted textures.
Most of the track was built inside Cubase using a combination of analog synths, saturation plugins and aggressive groove processing, mainly laid down with Macschine. I didn’t want the production to feel too polished — the goal was to keep some dirt and unpredictability in the mix so it still felt dangerous on a big sound system.
Native Instruments Maschine (Creative beatmaking)

Maschine is one of my favorite tools for building grooves because it sits somewhere between hardware and software. It has that fast, hands-on feeling where you can sketch rhythms quickly, experiment with swing and create more human drum programming without getting too stuck in editing. The workflow is especially good for house music because it encourages groove-based thinking instead of overcomplicated arrangements. I also love the built-in sampling and sequencing because it makes layering percussion and testing variations really fast.
On “Danger,” Maschine was mainly used to program three different groove versions for the arrangement: one main drop groove, one Breakdown 1 groove and one Breakdown 2 groove. The main drop version was tighter and more aggressive with stronger kick layering, sharper hats and extra percussion accents designed for maximum club impact. Breakdown 1 stripped things back and used lighter percussion with more space around the vocal and bassline, while Breakdown 2 became more experimental with looser swing settings and additional fills to create tension before the groove returned. I also processed some of the percussion through saturation and transient shaping afterward inside Cubase to make certain elements cut harder through the mix.
For producers making deeper tech house or underground club music, I’d really recommend building multiple groove versions instead of looping the exact same drums throughout the track. Even small changes in percussion timing, swing or ghost hits can completely change the energy of a section without needing more sounds. Maschine is perfect for this because it makes experimenting feel quick and musical instead of technical. One trick I use a lot is muting or removing elements instead of constantly adding new layers — sometimes less drums actually creates more tension on the dancefloor.
Cable Guys Shaperbox (Creative tool for soundsdesign)
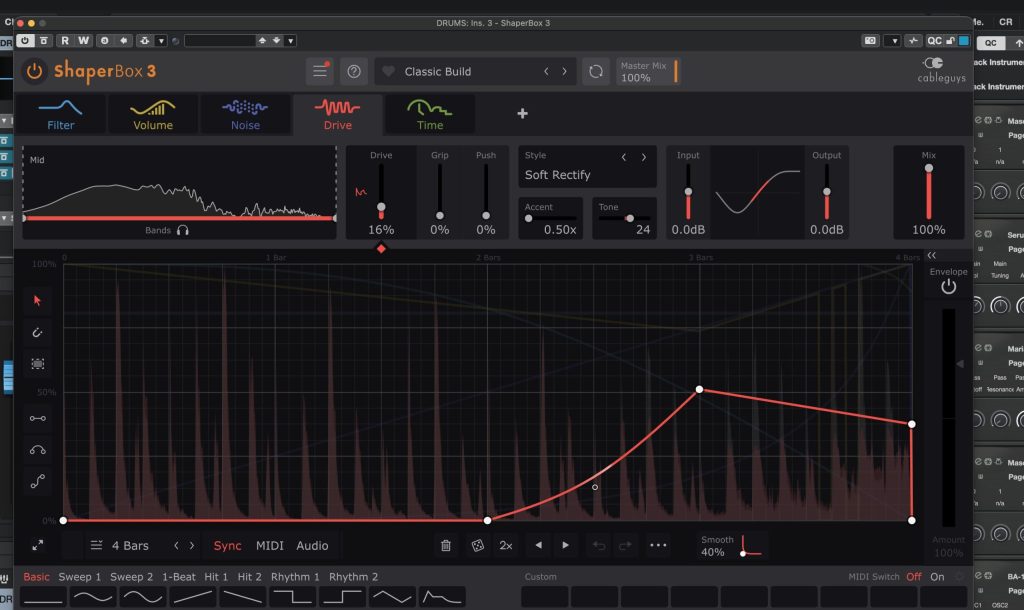
ShaperBox is one of those plugins that almost feels like cheating because it can completely transform static loops into something rhythmic and alive within seconds. Between the volume shaping, filtering, time effects and width automation, it’s basically an entire groove-design system inside one plugin. I use it less for extreme EDM-style effects and more for subtle movement and tension. Especially in deeper house music, those micro-movements make a massive difference.
On “Danger,” ShaperBox was used to process percussion loops, vocal stretching and some background textures to create swing and movement around the main groove. One of my favorite tricks was using halftime-style shaping to stretch vocals and delays. I also used filter automation synced to the arrangement to make repetitive loops slowly evolve over time instead of sounding copy-pasted. A lot of people think they need more sounds, but often you just need more movement.
For underground house producers, I’d recommend using ShaperBox more subtly than you think. Tiny groove manipulations can create a much more hypnotic feel than huge obvious effects. Another trick is automating stereo width rhythmically. Even very small width movements can make a loop feel wider and more expensive without adding new layers.
Undersal Audio LA-2A (Analogue style compressor)
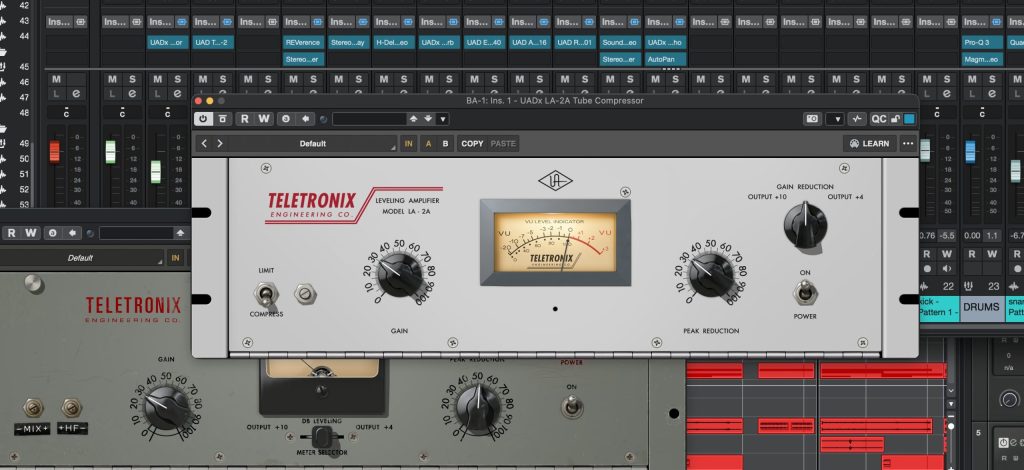
The UAD LA-2A is one of those legendary compressors that somehow works on almost any sound source you throw at it. Technically, it’s an optical compressor, so the compression reacts in a very smooth and musical way instead of aggressively clamping down on the signal. What makes it special is how it controls dynamics while also adding warmth, depth and a slightly polished analog feel. It’s one of those plugins that can make sounds feel more “finished” without sounding obviously processed.
On “Danger,” I honestly used the LA-2A on almost everything in some form. Vocals, percussion, bass textures, synth layers and even some background effects all passed through it at different stages because it adds this subtle glue and consistency that fits perfectly with underground house music. On the vocals, it helped smooth out peaks and lock phrases into the groove without making them sound overcompressed. On percussion and synths, I used lighter settings just to add movement and warmth while keeping the track dynamic and alive. Sometimes the plugin was doing very little technically, but the tone and cohesion it added across the mix made a huge difference when everything came together.
For producers making deeper tech house or club-focused records, I’d recommend thinking about the LA-2A less as a “vocal compressor” and more as a vibe tool for any instrument. Small amounts across multiple channels can create a really cohesive analog feeling without needing heavy processing. Sometimes subtle processing across many elements feels much bigger than extreme processing on one channel.
Wavesfactory Trackspacer (Mixing plugin)
Trackspacer is one of those plugins that solves mixing problems incredibly fast while still sounding very transparent. Technically, it’s a dynamic spectral processor that creates space between sounds by automatically ducking specific frequencies based on another signal. Instead of using heavy EQ cuts or aggressive sidechain compression, it reacts only where frequencies are clashing, which keeps the mix sounding clean and natural. For house music especially, it’s amazing for creating separation without losing energy or thickness.
On “Danger,” I mainly used Trackspacer on mixing busses to create cleaner separation between the most important elements in the groove. The biggest use was between the kick and bass buss, where I wanted the low-end to stay heavy and controlled without relying on extreme sidechain compression. I also used it between the vocal buss and synth buss so the vocal could cut through naturally while still keeping the synth layers wide and full. Most of the settings were actually very subtle — just small amounts of reduction with smooth timing — because the goal was clarity and movement without the ducking becoming too obvious or distracting.
I’d recommend using Trackspacer more subtly than you think, especially in deeper house and tech house where groove and warmth are everything. Tiny amounts can completely clean up a mix while still keeping the track feeling powerful and natural. One feature I use constantly is the mid/side option, because it lets you create space in the center of the mix while maintaining the width and atmosphere in the sides. That’s incredibly useful for keeping kicks, basses and vocals clear without collapsing the stereo image or making the mix feel smaller.
Quick Fire Tips For Making House
Tip #1: Build tension with arrangement changes, not just risers. The tempo-shift section in “Danger” worked because it interrupted the groove and the floor unexpectedly without losing momentum.
Tip #2: Don’t over-layer drums. One great kick, one strong clap and a few textured percussion loops usually hit harder than huge stacks.
Tip #3: Use distortion creatively. Slightly dirty sounds often feel bigger and more emotional in underground club environments.
Tip #4: Automate constantly. Tiny changes in saturation, stereo width or filtering keep repetitive grooves interesting over long DJ-friendly arrangements.
Tip #5: Test your tracks quietly. If the groove still feels addictive at low volume, it will usually work well on a club system too.