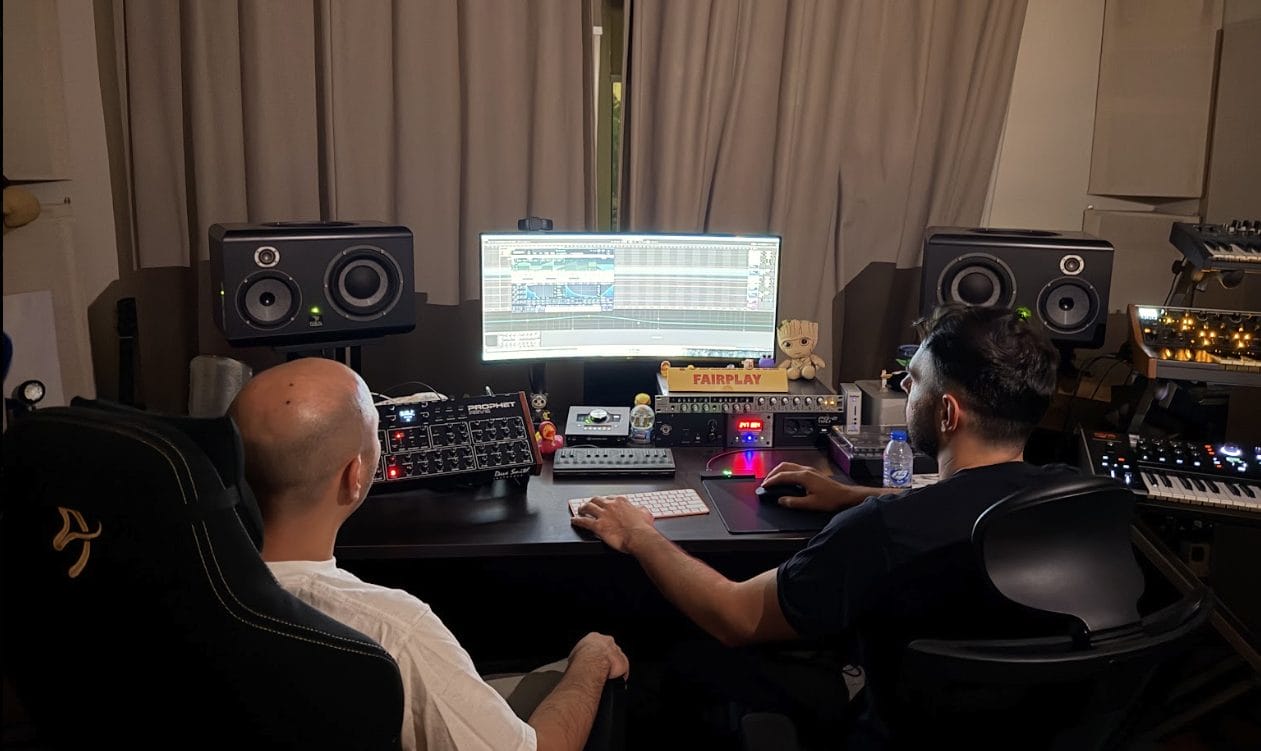
Pete Tong signing a record from Jordanian producers FairPlay (@__fairplay) and Roo (JO) (@roo.music) to Places & Spaces already gives “Al Jaw” an interesting position, especially after Tong opened his IMS Ibiza set at Dalt Vila with it and later played it again at Blue Marlin. Support has also come from Black Coffee, Themba, and Robin M, giving the record considerable exposure around its August 7 release.
The production itself is much less complicated than that early support might suggest and taking a deeper look into the track through another How It Was Made feature basically felt like an obligation at that point. Roo sent FairPlay the traditional Arabic vocal that became the starting point, and instead of filling the project with layers, they kept returning to that vocal while building the drums, bass, and synth parts around it.
The drums are sample-based, the low end comes from a Moog Sub 37, and almost everything else was designed in Serum.
That decision is central to how “Al Jaw” works. FairPlay’s Ableton project is divided between vocals, drums, instruments, bass, and effects, yet much of the development comes from sounds changing over time rather than new parts constantly entering the arrangement. Below, the duo gets specific about the Serum patches, Sub 37 bass, long Ableton reverb, dotted-eighth Echo, and master processing behind the record and te rest of the feature below is written in their words!
Behind the Track
Al Jaw started when Roo sent us the vocal. It already had a really distinct character and phrasing, so our first instinct was not to overcomplicate it. We built the track around that feeling, using the vocal as the anchor while the groove and musical world developed around it. From there, the drums came together through sample selection, the bass was recorded from our Moog Sub 37, and almost all of the remaining musical elements were designed in Serum.
The Ableton session reflects that approach. We keep the project divided into clear groups for vocals, drums, instruments, bass and effects, which makes it easy to strip the record back and rebuild it without losing the core groove. There are several vocal lanes, a compact sample-based drum section, a bank of synth parts that enter and leave in different combinations, a dedicated bass group, and shared send effects for space and movement.
The main production lesson for us was that depth does not always come from adding more layers. A lot of the character came from making individual sounds evolve and then letting the arrangement create contrast. The Moog gives the low end a more physical foundation, the main Serum lead stays direct and recognizable, the supporting synths carry more internal movement, and the effects are used as arrangement tools rather than being left on all the time.
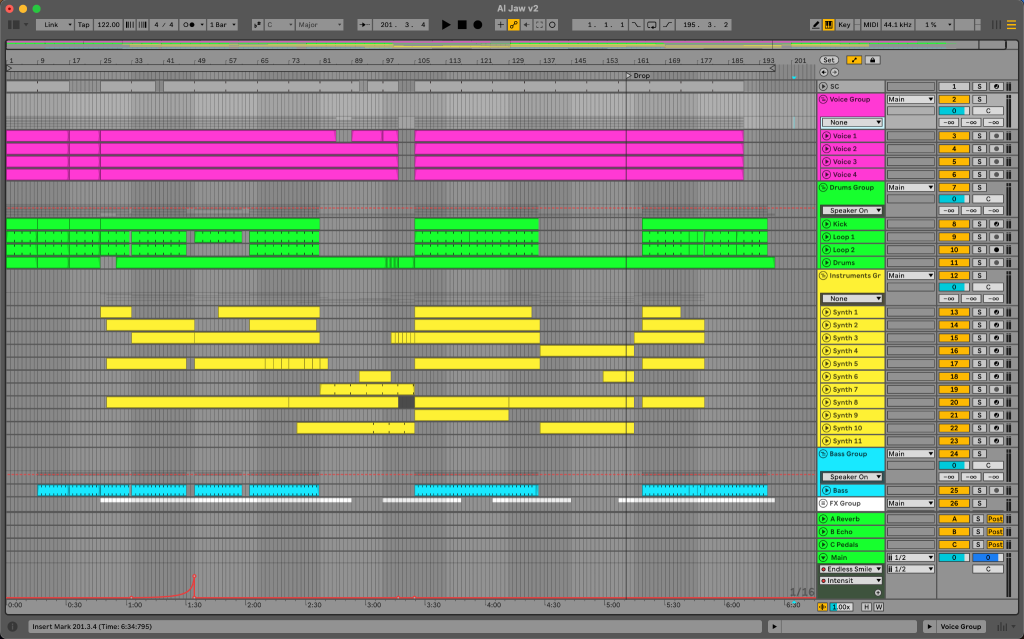
Figure 1. Full Ableton Live arrangement for Al Jaw, organized into vocal, drum, instrument, bass and FX groups.
Xfer Serum – Main Synth
Serum is one of the synths we reach for most because it lets us move quickly while still giving us detailed control over a sound. The relationship between wavetables, envelopes, LFOs and filters is very visual, which is useful when a patch needs to evolve rather than sit in one state. On Al Jaw, Serum became the main source for the lead and supporting synth material, but we deliberately made the patches do very different jobs so the record would not feel like one repeated synth texture.
The main lead is intentionally simple and percussive. It uses the PWM Maths 2 wavetable on Oscillator B pitched one octave down, with a sine sub underneath and a small BrightWhite noise layer for extra edge. The sound is shaped with Serum’s MG Low 12 filter and a very fast envelope: roughly 0.5 ms attack, 472 ms decay, no sustain and a 15 ms release. It is also set to mono/legato, while a quarter-note LFO adds a little movement without making the modulation too obvious. Keeping this sound controlled was important because there is already a lot of motion around it in the arrangement.
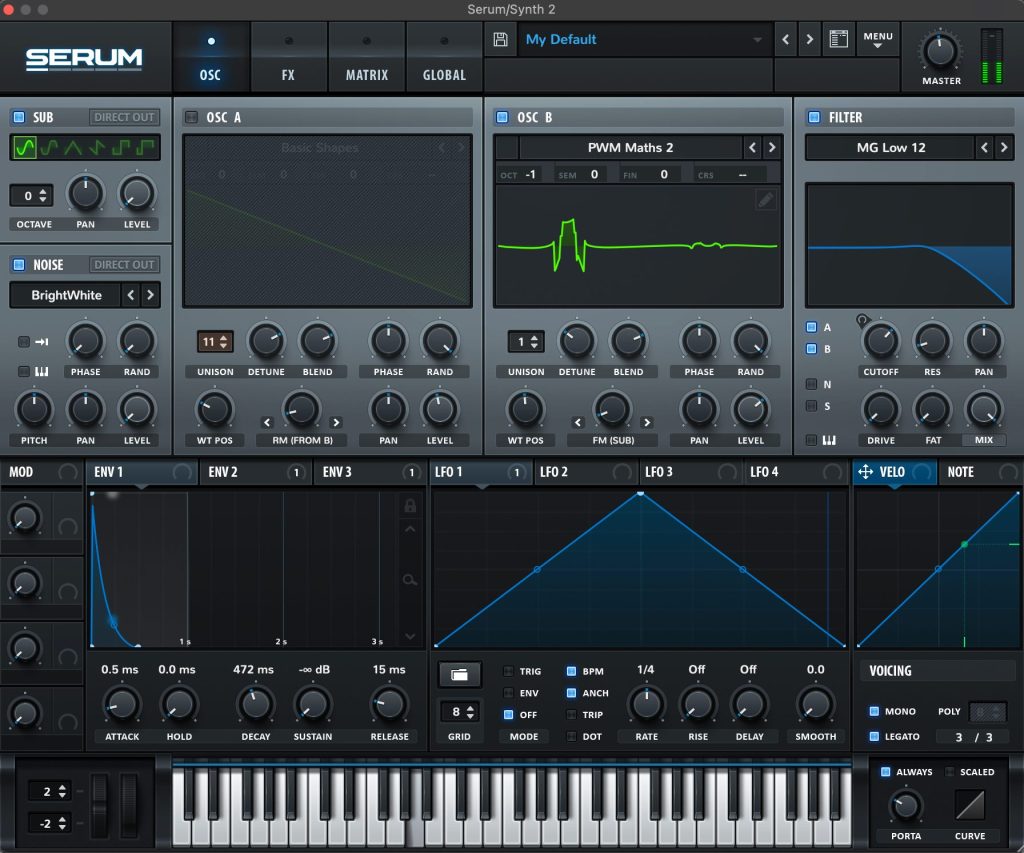
Figure 2. Serum main lead patch: PWM Maths 2 one octave down, sine sub, BrightWhite noise, MG Low 12 filtering and a short pluck-style envelope.
The supporting synth is where we let Serum become much more animated. Oscillator A uses the AlienSpectral [SN] wavetable with seven voices, while Oscillator B uses Analog_BD_Sin, with BrightWhite noise and another MG Low 12 filter shaping the sound. Several envelopes and LFOs are routed through the matrix to move filter frequency, oscillator volume, wavetable position and even the rate of another LFO. That internal movement allows a relatively simple MIDI part to keep changing without adding another layer.
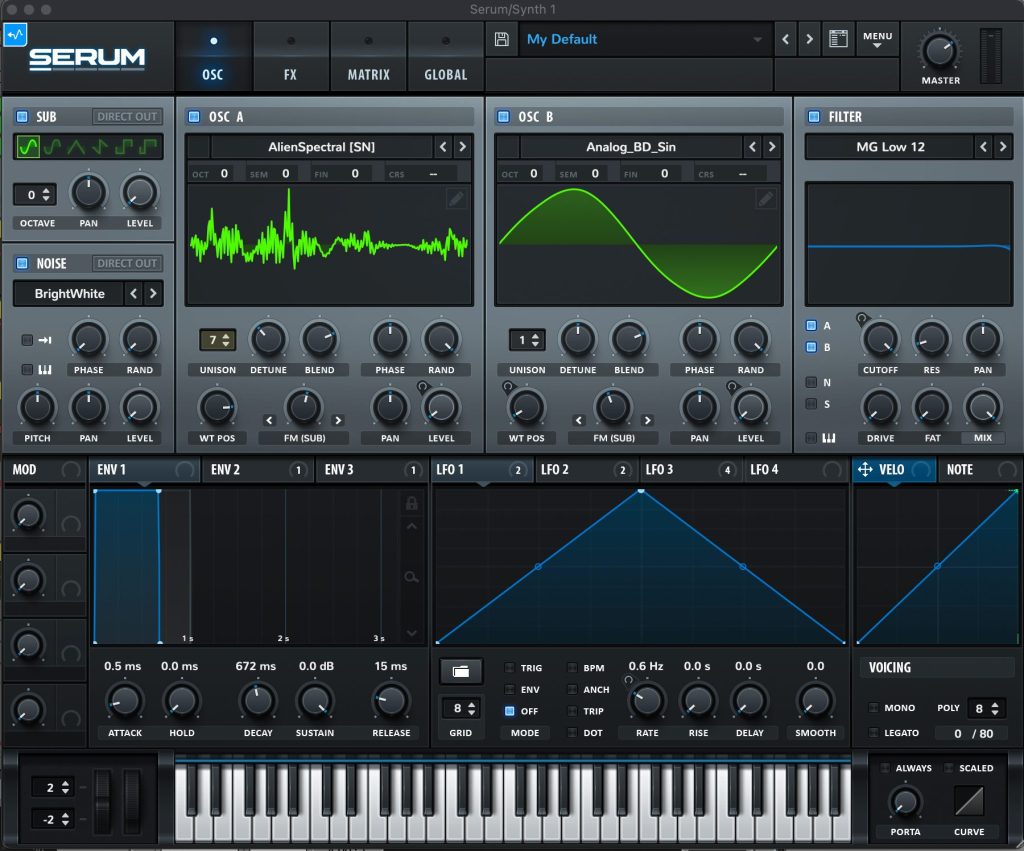
Figure 3. Supporting Serum patch using AlienSpectral [SN], Analog_BD_Sin, BrightWhite noise and multiple LFOs.
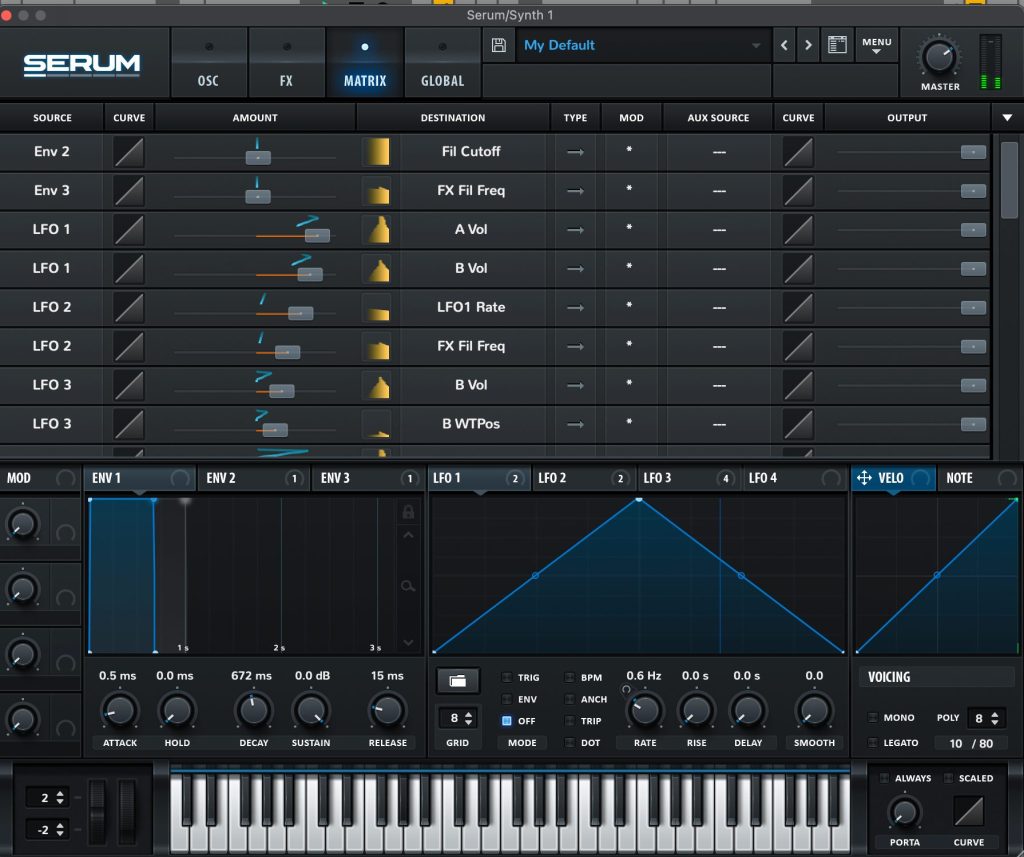
Figure 4. Modulation matrix for the supporting synth. Envelopes and LFOs move filter cutoff, oscillator levels, LFO rate and wavetable position.
For producers working in Afro House or melodic club music, that is one of our favorite ways to use Serum: keep the notes simple, then create complexity inside the patch through subtle modulation. You do not always need another melody or another layer. Sometimes a small amount of movement in volume, filter position or wavetable position is enough to stop a loop from feeling static.
Moog Sub 37 – Bass Foundation
The bass in Al Jaw was recorded from our Moog Sub 37. It gave us a different kind of weight from the Serum layers around it: more physical, slightly less polished, and very immediate in the low end. We recorded the synth into Ableton and treated it as the foundation of the groove rather than trying to make the bass patch overly complex.
We kept the musical role of the bass simple and focused on the relationship between the notes, the envelope and the kick. Because so much of the track’s melodic material was built digitally in Serum, using the Sub 37 underneath it created a useful contrast. The analog bass anchors the record while the more animated digital patches can move around above it without the whole track feeling overly synthetic.
For club-focused bass sounds, we usually prefer getting the character right at the source before reaching for a long processing chain. A synth like the Sub 37 can sound substantial with a relatively straightforward patch, so the real work is choosing the right register, note length and movement for the groove. If the bass already feels good against the kick before heavy processing, the rest of the mix becomes much easier.
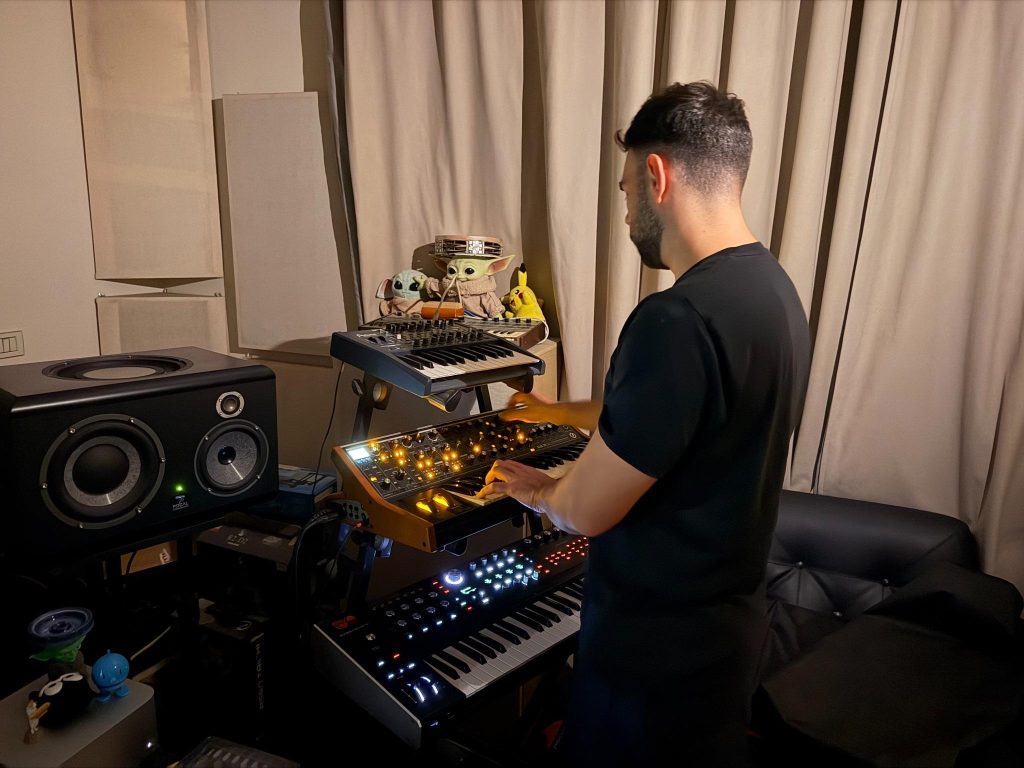
Figure 5. Recording and shaping the bass on the Moog Sub 37.
Ableton Reverb – Creating the Space
Ableton’s stock Reverb is one of those effects that can be very simple or very deep depending on how far you want to push it. We often prefer using a reverb on a return track rather than inserting a different reverb on every channel, because it gives several sounds a shared sense of space and keeps the session easier to control. On this track, Return A is essentially the long atmospheric room around an otherwise fairly dry groove.
The settings are deliberately extreme in length but controlled in frequency. The return is 100% wet, with a 100% size setting, an 8.96-second decay and full stereo width, but the input is filtered hard: the low cut is around 830 Hz and the high cut is around 5.85 kHz. There is only 2.5 ms of predelay, so the reverb reacts quickly, while the filtering prevents that huge tail from filling the low end or becoming too bright. We send selected synth and vocal moments into it when we want the arrangement to open up, then pull the send back when the groove needs to feel close again.

Figure 6. Return A: Ableton Reverb at 100% wet with an 8.96 s decay, 100% size/stereo and a heavily band-limited input.
A useful trick with very long reverbs is to think less about the decay time and more about what you allow into the reverb. A nine-second tail can sound surprisingly clean if the low frequencies and brittle highs are removed before they hit the space. We also prefer automating the send amount rather than leaving the effect static, because the contrast between dry and wet sections is what makes the space feel dramatic.
Ableton Echo – Rhythmic Movement
Echo is another stock Ableton effect we use a lot because it can add movement without requiring another musical part. It is especially useful in a sparse arrangement: a short phrase can leave a rhythmic trail behind it, filling the gaps while the original sound stays simple. We tend to use delay as a send effect so it can appear only on the moments that need it.
On Return B, both the left and right delays are set to dotted eighth-notes, with 50% feedback and full stereo width. The repeats are filtered between roughly 50 Hz and 5 kHz, which keeps the delay focused in the middle of the spectrum rather than competing with the low end or adding too much top-end clutter. The built-in reverb is off and the Dry/Wet is set to 70%. We use it selectively to extend certain phrases and stop transitions from feeling too empty.
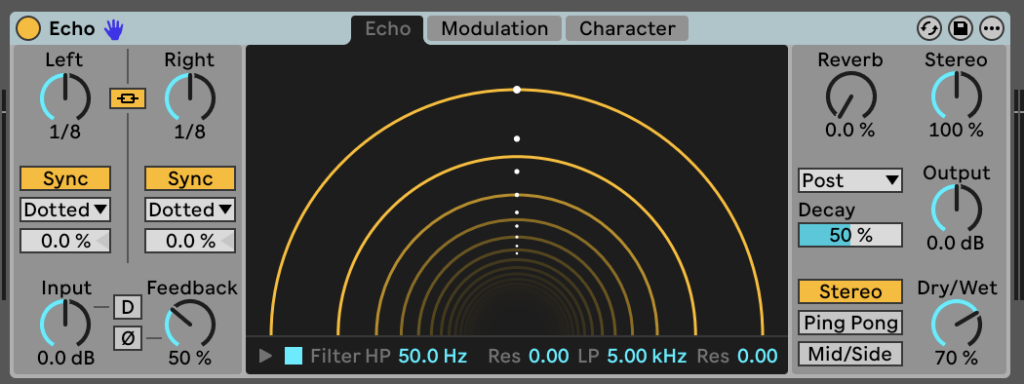
Figure 7. Return B: dotted 1/8 Echo on both sides, 50% feedback, 50 Hz-5 kHz filtering and 100% stereo width.
For melodic or Afro House, a short tempo-synced delay can often create more groove than another percussion loop. The important part is to filter the repeats and control the feedback so the effect has a clear ending. Automating sends at the ends of phrases makes the delay feel like part of the arrangement instead of a permanent layer sitting on top of it.
Dada Life Endless Smile – Build-Up Control
Endless Smile is a very simple macro-style build-up effect: one intensity control moves several transition processes at once. It is useful when we want a quick rise in tension without drawing a large number of separate automation lanes. It is not something we leave on continuously; for us it works best as an arrangement tool that appears for a few bars and then disappears completely.
On Al Jaw we place Endless Smile on the master and use the ‘Fist in the Air’ setting in Soft mode. The intensity is automated during the build sections, so the entire mix gradually feels more filtered, washed out and suspended before the groove returns. The important move is the reset: the effect drops back out as the main section arrives, which makes the kick, bass and transients suddenly feel much closer again.
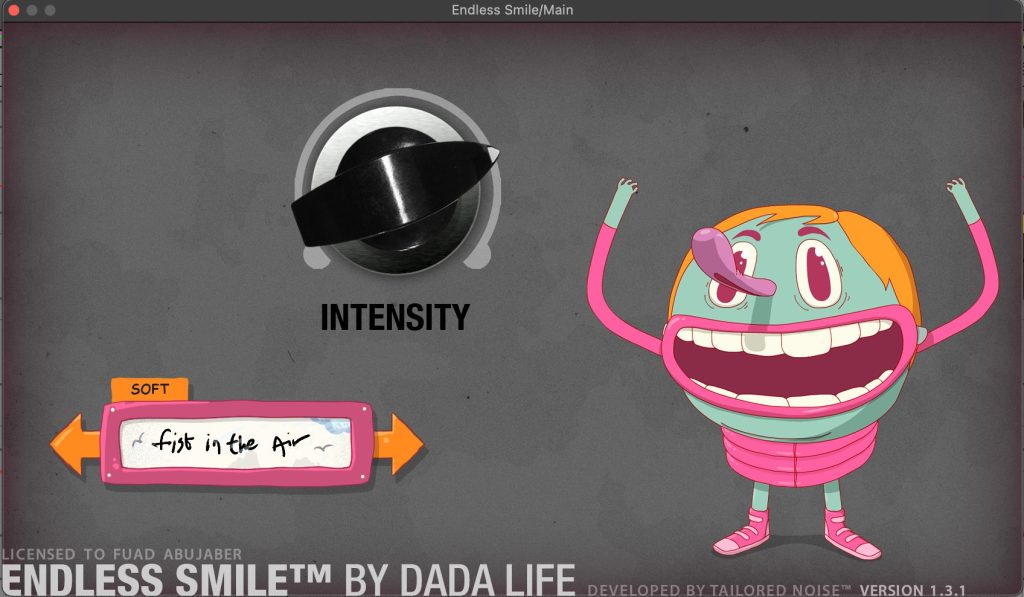
Figure 8. Endless Smile on the master using the ‘Fist in the Air’ setting in Soft mode, automated only during build-ups.
The biggest mistake with one-knob build-up effects is pushing them too hard or using them on every transition. We get better results when the effect is supporting a build that already works musically rather than trying to manufacture excitement by itself. The contrast is more important than the amount of effect.
A Note on the Drums and Vocal
The drums in Al Jaw are sample-based. We spent more time choosing sounds that already fit together than trying to rescue the wrong samples with long processing chains. The kick and loops stay relatively direct, which gives the synth movement and long send effects room to breathe.
The vocal was the starting point for the whole record. Roo sent it over to us, and we arranged it across several vocal lanes so different phrases could appear, disappear and overlap without turning the track into a conventional verse-and-chorus structure. We wanted the vocal to keep its personality and act almost like another rhythmic and atmospheric element in the arrangement, rather than over-processing it or forcing it into a more traditional song structure.
That workflow is part of the overall philosophy of the track: commit to strong source material, then create interest through timing, arrangement and automation. If an element already has the right tone, we would rather make a few deliberate moves than stack processors just because they are available.
Quick-Fire Hot Takes on the Scene + Production
Hot Take #1: The fastest way to improve a mix is to stop trying to fix bad samples. If a kick needs a huge chain of processors just to feel right, choose another kick.
Hot Take #2: One synth you know deeply is more useful than twenty you barely understand. A big part of Al Jaw came from getting very different jobs out of Serum instead of changing instruments every five minutes.
Hot Take #3: Movement is more important than layering in melodic electronic music. A sound that evolves over sixteen bars can do more for a record than adding another three static layers.
Hot Take #4: Build-ups are about contrast, not volume. If everything is already huge before the drop, the drop has nowhere to go.
Hot Take #5: Do not be scared of long reverb tails. Filter what you send into them and you can make the atmosphere massive without turning the mix into fog.

Will Vance is a professional music producer who has been involved in the industry for the better part of a decade and has been the managing editor at Magnetic Magazine since mid-2022. In that time period, he has published thousands of articles on music production, industry think pieces and educational articles about the music industry. Over the last decade as a professional music producer, Will Vance has also ran multiple successful and highly respected record labels in the industry, including Where The Heart Is Records as well as having launched a new label with a focus on community through Magnetic Magazine. When not running these labels or producing his own music, Vance is likely writing for other top industry sites like Waves or the Hyperbits Masterclass or working on his upcoming book on mindfulness in music production. On the rare chance he's not thinking about music production, he's probably running a game of Dungeons and Dragons with his friends which he has been the dungeon master for for many years.