Last week on February 13th, 2026, Aamir Zee dropped “On Time,” marking his first solo outing on the Jesse Calosso-helmed imprint. Known within the extended Cuttin’ Headz and Boogeyman ecosystem as one half of Late Delivery, Aamir steps forward here with a stripped, groove-focused approach that leans into minimal tech foundations while keeping the low-end tight and functional for club systems.
The title track pairs intricate percussion with a driving bass motif and vocal hooks designed to cut cleanly through the mix, while B-side “Roses” moves into deeper territory with hazier textures and weightier low-end pressure.
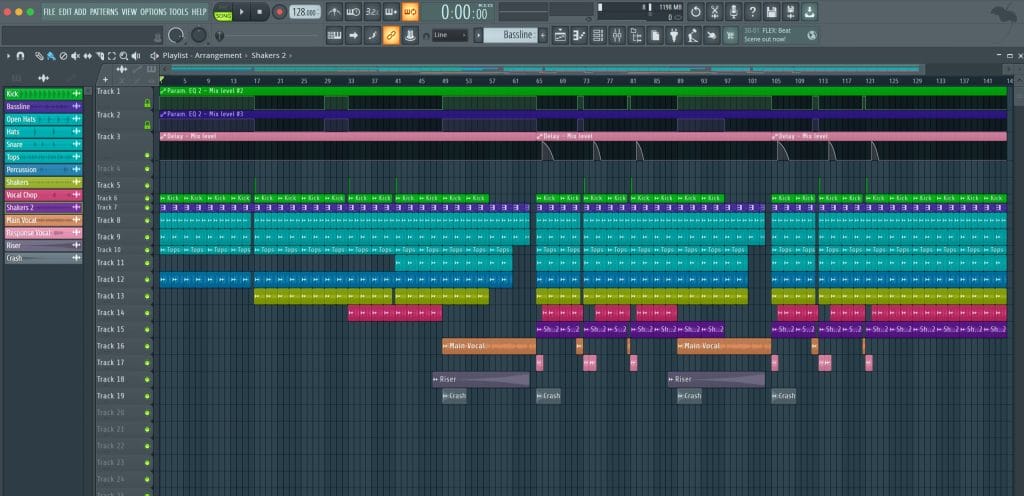
In this How It Was Made breakdown, Aamir walks through the full FL Studio session behind “On Time,” explaining how the track was built using one-shot samples, stock plugins, and a handful of free tools. From constructing the bassline in the piano roll to shaping it with multiple instances of Fruity Parametric EQ 2 and adding top-end clarity with Slate Digital’s Fresh Air, the focus stays on workflow, efficiency, and maximizing the tools already inside the DAW.
Below is Aamir’s full artist-submitted breakdown.
FL Studio
I want to preface this entire article by saying that I’m fully aware of the reputation FL Studio sometimes gets and how Ableton is considered “king,” and blah blah blah, we get it. That said, FL Studio has been around for a long time for good reason. It’s incredibly user-friendly, comes with excellent stock plugins, and Image-Line offers free lifetime updates. This isn’t an ad, just a genuine shoutout to the FL producers.
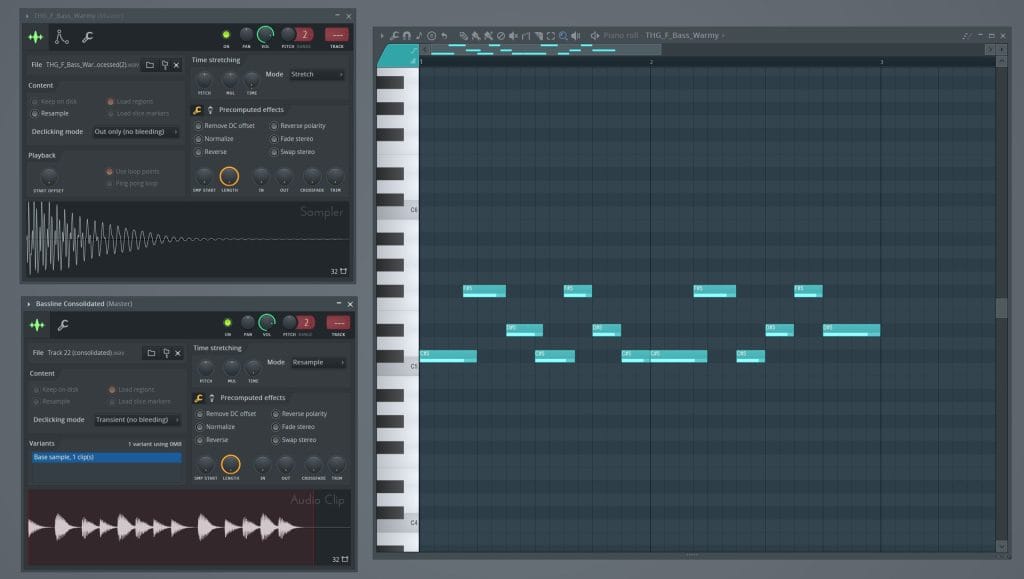
For all the new and up-and-coming artists: you don’t need every fancy plugin or expensive VST you see on producers’ Instagram posts and tutorials. You can make a hit quality record with the bare minimum. On Time was produced using sample one-shots, FL Studio stock plugins, and a handful of free plugins available to everyone. The bassline, in particular, was created using a
simple one-shot sample I downloaded from Loopcloud. I dropped it into the piano roll, played it in MIDI, and built out the pattern from there. Once I was happy with the melody, I bounced the MIDI into an eight-bar audio file.
One important tip: always bounce your MIDI without any EQ or effects. This gives you full flexibility to shape and process the sound later, exactly how you want, within the bassline channel rack.
The channel rack for the bassline is set up as follows: first, Fruity Parametric EQ 2 to remove unwanted frequencies, especially anything below 20Hz. Next, there’s another instance of Fruity Parametric EQ 2 used to boost the sub frequencies around 60Hz. And yes, don’t judge, there’s a third Fruity Parametric EQ 2, which is automated and used as a high-pass filter throughout the track. To sidechain the bassline to the kick, I used Avicii’s Fruity Peak Controller technique, which sits on the kick channel and is routed and automated accordingly. I know what you’re thinking: “How did this guy land a feature on Magnetic Magazine?” That would be a fair reaction and honestly, I have no idea.
Fruity Parametric EQ 2
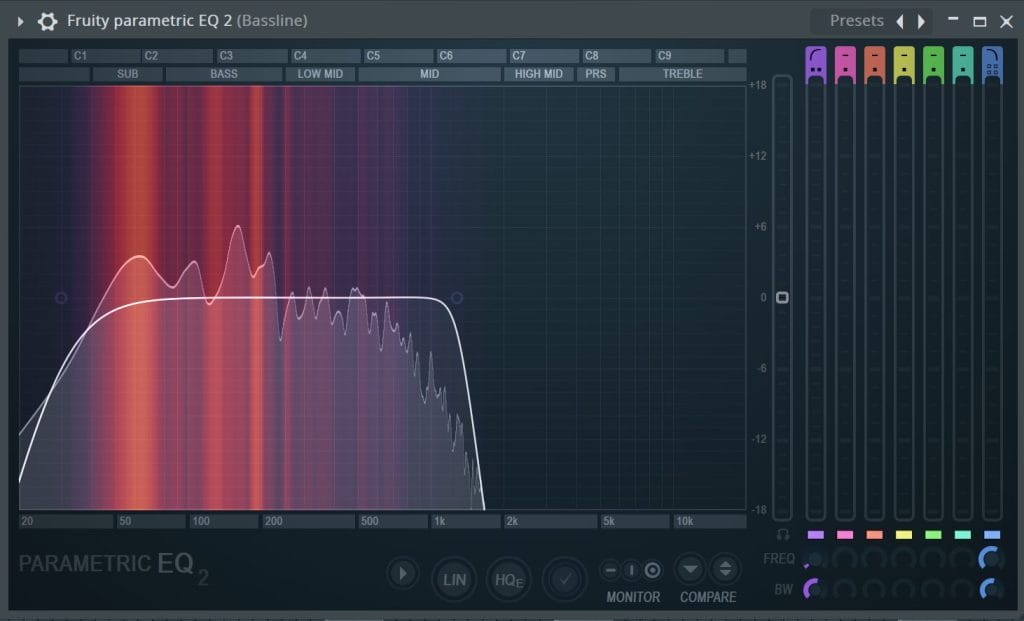
The Fruity Parametric EQ 2 is a stock plugin in FL Studio and an advanced 7-band visual EQ that I rely on across virtually every channel in my mixer. It’s extremely versatile and can be
applied in a number of different ways. As mentioned earlier, I used it three separate times on the same channel rack, each instance serving a completely different purpose. In terms of overall functionality, you could loosely compare it to FabFilter Pro-Q. While Pro-Q is definitely more advanced and visually polished, I intentionally chose to stick with stock plugins for this project to show just how powerful the built-in tools can be.
In this session, the first instance of Fruity Parametric EQ 2 was used for corrective EQ, focusing on removing unwanted frequencies and cleaning up the sound. The second instance was used for subtle tonal shaping, enhancing the character of the sound and helping it sit better in the mix. The final instance was applied for fine-tuning and small adjustments, ensuring clarity and balance without over-processing. Using the same plugin in different stages of the signal chain helped keep the workflow simple and consistent while still allowing for precise control.
The plugin includes a selection of presets that serve as solid starting points for a variety of applications, and they can be easily adjusted to suit your specific needs. Take advantage of these presets. They will help speed up the workflow and provide a reliable foundation to build from. You can quickly dial in a sound and fine-tune it to fit your mix. This makes the creative process more efficient while still allowing plenty of room for customization and experimentation.
Fresh Air
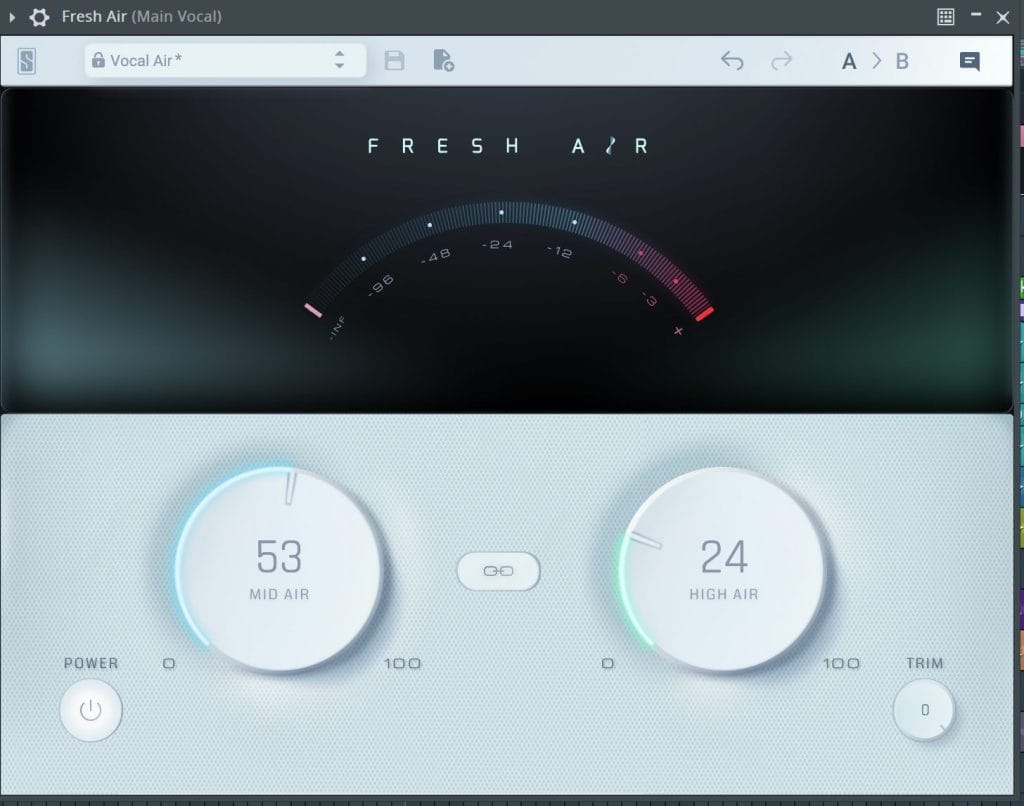
Fresh Air is a free plugin from Slate Digital designed to enhance high frequencies in a smooth, sexy way. Instead of simply boosting the top end, it uses dynamic processing and subtle saturation to add brightness, clarity, and presence without sounding harsh or brittle. The plugin features two simple controls Mid Air and High Air, which make it easy to dial in exactly how much sparkle you want. It’s a quick and effective way to bring life to vocals, drums, and melodic elements.
On this track, I mainly used Fresh Air on the vocals and drum tops to help them cut through the mix without overpowering everything else. I leaned more on the High Air knob for subtle shimmer and used the Mid Air control sparingly to add presence without introducing harshness. In some sections, I automated the amount to slightly lift the energy during drops and key moments. To keep things smooth, I followed it up with light compression and EQ to make sure the added brightness stayed controlled and natural.
For producers working in house and dance music, Fresh Air is an easy way to add clarity and excitement, especially to vocals, hi-hats, and percussion. A little goes a long way, so subtle settings usually deliver the best results. One trick is to automate it during builds and drops to help transitions feel more dynamic and energetic. It’s also great for reviving dull sounds and giving them that modern, polished top end without needing complicated processing chains.
Quick Fire Tips For Making Music

Tip #1: Start with the kick and bassline if those two don’t hit, nothing else matters. Lock the groove, then build everything else around that foundation.

Tip #2: Use simple sounds and focus on processing, movement, and automation to create energy. You don’t need fancy plugins! Clean EQ, smart filtering, and subtle saturation go a long way.
Tip #3: Create meaningful tension and release using automation on filters, EQs, and effects. Small movements over time make your drops feel bigger and your transitions hit harder.
Will Vance is a professional music producer who has been involved in the industry for the better part of a decade and has been the managing editor at Magnetic Magazine since mid-2022. In that time period, he has published thousands of articles on music production, industry think pieces and educational articles about the music industry. Over the last decade as a professional music producer, Will Vance has also ran multiple successful and highly respected record labels in the industry, including Where The Heart Is Records as well as having launched a new label with a focus on community through Magnetic Magazine. When not running these labels or producing his own music, Vance is likely writing for other top industry sites like Waves or the Hyperbits Masterclass or working on his upcoming book on mindfulness in music production. On the rare chance he's not thinking about music production, he's probably running a game of Dungeons and Dragons with his friends which he has been the dungeon master for for many years.