In the world of electronic music production, there’s nobody who does it quite like Mr. Bill.
In recent years, we’ve seen the Australian music producer reach incredible heights while putting out some of the most forward-thinking bass music we’ve ever heard. He’s also been working hard behind the scenes, recently putting out a new drum pack on Splice, creating Pigments presets in collaboration with Arturia, and speaking with several music tech legends on his podcast recently. So, what’s his next step? Turning everything we thought we knew about him on its head.

The new album “Mr. Melanzana“, out today, marks a bold and introspective new chapter for Mr. Bill: a return to his roots in textured, technical downtempo. Conceived as the studio counterpart to “Sequenza di Melanzane”, his collaborative audiovisual performance with longtime visual partner Funilab for Tipper’s final Red Rocks show, the album bridges the worlds of live improvisation and the meticulous sound design we know and love him for.
Where “Sequenza di Melanzane” painted vast visual and sonic landscapes across the Red Rocks amphitheater, “Mr. Melanzana” translates that same sense of wonder and melancholy into a deeply introspective listening experience. It’s music for the in-between moments: meditative, groovy, and full of emotional nuance. At its core, the new album is about exploration: a space for mental meandering, reflection, and play. It’s Mr. Bill at his most vulnerable and most precise, channeling years of creative evolution into one cohesive, beautifully strange experience.
On this installment of our How It Was Made series, we sat down with the man himself to discuss how he put together “Anhedonia“, a standout track from the new album. Take a listen to the new record below, and read on to gain some invaluable production tips from a true master of his craft.

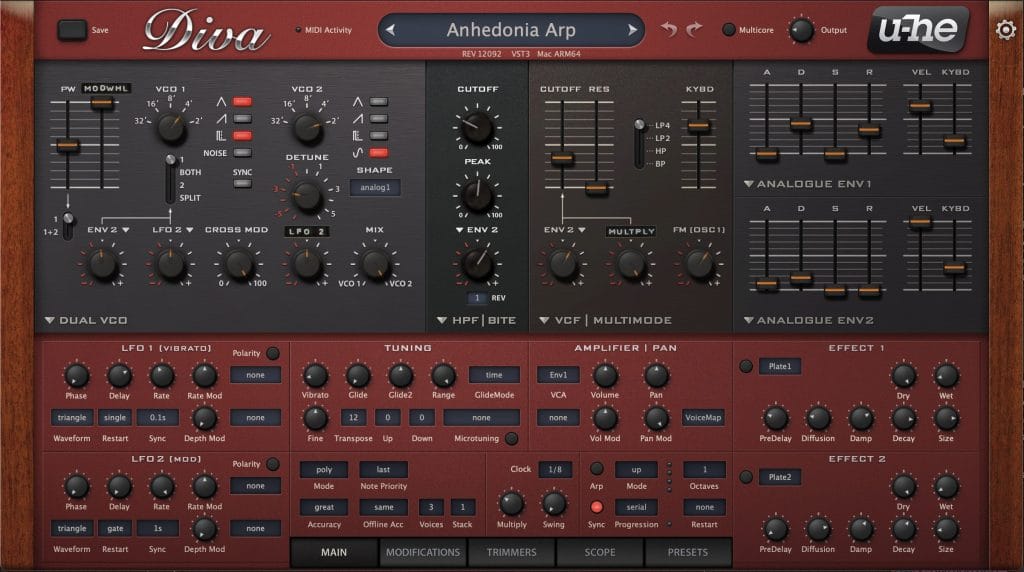
Diva
Diva is a really common software synth that is designed to emulate analog synths, of which it does a great job! It’s basically 5 analog synths in 1 software synth – very efficient.
The main sound I wanna talk about is the main, metallic arp thing you hear in the intro & through the first drop. I don’t remember where this patch started (as this project was quite old when I picked it back up recently to finish), but I can talk about its current state & how it works with some certainty!
First off, the patch is using the Dual VCO oscillator which as it sounds is a simple 2 oscillator setup, I’m using VCO 1 to cross modulate VCO 2 (a sine wave) with a triangle wave an octave higher than it which makes it sound a little more detuned & weird. I’m then highpassing that with the HPF Bite filter (which as it sounds is a HPF with some bite, however I’m not really making it bite too much in this case as peak (generally called resonance on most filters) is set to about the halfway point.
That then runs into the VCF Multimode Filter, which is being modulated by both Envelope 2 (a very tight, short shape to make it stabby) + the Multiply modulator (which is a cool thing Diva has where you can multiply 2 modulation sources – in this case PitchWheel & LFO 2), this filter is also modulated by the MIDI note value, so in this case, I’m playing an arp into, which means higher notes will be less LPF’d than lower ones.
I’m then using the Analogue Env’s for various modulation to things (eg. making the filter stabby). I’m then using the Oscillator Voice Detune area to make every note that is played slightly detuned (which is what you’d expect on an analogue synth), the way Diva does this (and you’re seeing other synths like Serum 2 add this feature in these days more often) is you have a round robin matrix where you can set each step of that matrix to be slightly detuned by a certain amount, and in the case of this arp that is part of the detuned sound you’re hearing. I’ve also attached the Pan Mod to VoiceMap (another cool thing Diva has) where you can again somewhat randomize the panning in a controlled manner, little things like this I think are what bring this sound to life.
The processing on this sound is quite elaborate (there’s about 30 devices after Diva doing small amounts of processing) & I think explaining it all in as much detail as the patch would take a long time, so I’ll just say that it’s a mixture of: OTT, more filtering, small amounts of distortion/widening/space, etc mostly just to make it sound as nice & finished as possible.
Honestly Diva just sounds great out of the box, you’d be hard pressed to try make a bad sound with it. My advice would just be to click around & see what happens – that’s exactly how I made this sound (and how I make most sounds actually). In fact doing a post-breakdown on this sound was kinda illuminating to me.

OB6
The breakdown of this tune (the chill, melodic, middle section at around 1:43’ish) uses my Sequential – OB6 for the Reese bass & some of the pads. The OB6 is an amazing hardware synth made in collaboration with Dave Smith (the guy who literally invented MIDI), and Tom Oberheim! The sound portion of it is inspired by Tom’s synths (so the classic Oberheim oscillator/filter/envelope designs) mixed with the really nice usability, modulation, sequencing & FX of Dave Smith’s synths. It’s the best of both worlds, and I love it, it’s probably (along with the Polyend Tracker Mini) my favorite piece of hardware, which is saying something, cos I usually don’t really care for hardware.
My strategy for making sounds in general (as aforementioned) is to just mess around & find out. Usually with the OB6 I’ll start clicking through presets to find a decent starting point & from there I’ll generally start turning things off to see what I can get rid of, and then tweak some things to see what could be nice to modulate, or jam on, and from there I’ll hit record & do a few takes of myself twiddling around with knobs & such, then pick my favorite bits from those recordings & include them in the song (with maybe a bit of processing in the box – small amounts of EQ, Compression, OTT, Reverb, etc – whatever I think it needs).
There’s a barrier to entry involved here as the synth costs a few grand, but I would recommend if anyone reading this has the opportunity to play around with an OB6, then you absolutely should. They sound incredibly lush. The strategy I would recommend is to just click through presets until you find something you like, then start messing with parameters & you’ll eventually intuitively understand what things are doing & obviously you’re the best barometer for whether or not you think something sounds good, or interesting!
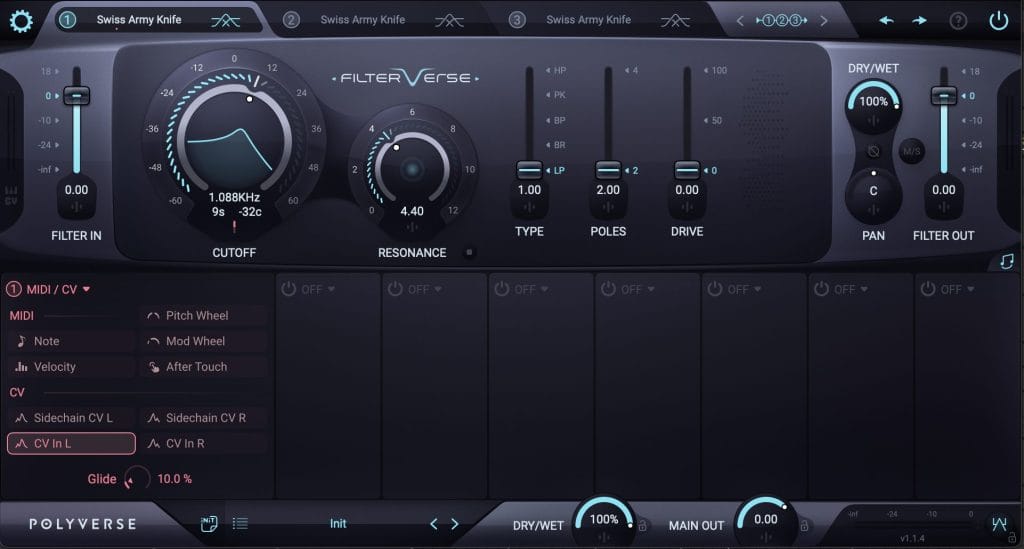
Filterverse
I used Filterverse on this track a lot (as well as on the rest of the tracks on the album), it’s a new plug-in by Polyverse that includes about 30 different filter types for 3 filter engines that you can run in a mixture of parallel, or serial configurations. It’s extremely powerful for wild sound design stuff & sounds very nice & clean in my opinion.
In the case of the arp in this track, I sent the MIDI input (so the note values of the arp) into the cutoff of Filterverse & boosted the resonance on the Swiss Army Knife filter type, so separate note moves the value of the cutoff, which kinda adds a nice, (and importantly – dynamically different) resonant peak to each note of the arp.
One cool trick with Filterverse is you can attach a Metaknob modulator (basically a static position on a modulation source) to modulate the left & right channels of any parameter independently. So often I’ll add a Metaknob to the cutoff of a filter or something & just turn it up by 10% (or not even) to add some minor stereo width to that parameter.

Infiltrator 2
Infiltrator 2 by Devious Machines played a big part in this album! It’s basically a really elaborate multi FX unit that has around 50 in-built FX modules, where of those 50ish effects, you can chain 10 of them together in series, OR sequence through them on a step sequencer. You can also modulate each effect with a separate curve (similar to Shaperbox or something like that). Needless to say this is very powerful for sound design & so I used this a lot on this album & have just been using it a lot in general lately.
My general strategy with this plugin is to just click through presets & tweak macros whilst recording into Rolling Sampler (a buffer recorder), then take the result of this jam (colloquially known as a “Mudpie” by many) & then chop sections out of that file as fills, or repeating phrases. I’ve definitely gotten a lot of really cool phrases, textures, and fills from this method in the past.
Once again, the same strategy I’ve been mentioning previously. Mess around & find out basically!

Quick Fire Production Tips:
- Electronic music doesn’t need to get louder or heavier. It needs to get riskier. The obsession with loudness, heaviness, and “bigger drops” has hit a ceiling – it’s maxed out (I think/hope…). The next evolution isn’t another dB of headroom abuse; it’s creative risk, & breaking formulas.
- If your mix/master sounds bad, it’s likely an arrangement issue. People love blaming their mix when the real problem is composition. If you’ve got five basslines playing at once, no amount of EQ or compression is going to make that sound normal. Good arrangements practically mix themselves because each element has space to breathe. Clarity isn’t in plugins, it’s in decisions you make. Arrangement is mixing in disguise.
- The most powerful tool in your studio is your own curiosity. Every plugin, synth, and DAW feature is useless without curiosity driving it. The producers who level up fastest aren’t the ones with the best gear – they’re the ones who keep asking “what happens if I try this?” Curiosity is where mistakes turn into new techniques. When you stop exploring and start just executing, your music starts sounding like everyone else’s. Curiosity is the one piece of gear that never goes obsolete.
Stream “Mr. Melanzana” here.
Ben Lepper is a music producer and journalist from Boston, Massachusetts.